Mobile App Development: Process, Architecture, and Strategic Decisions
September 2, 2026 |
Reading Time: 9minutes
Mobile app development is the process of turning an idea into a working app that people actually want to use. It covers planning, architecture, design, coding, testing, and launch. Businesses that skip the early decisions often end up with apps that cost more, take longer, and don’t solve the right problem.
This guide walks through the full mobile app development process step by step. You’ll learn how to plan an app, choose the right architecture, decide between MVP and full-featured builds, pick the right technology, and launch with confidence.
At Wavy Informatics, we’ve worked with startups and businesses to plan, design, and build apps that solve real problems. This guide reflects what we’ve learned from those projects.
What Is Mobile App Development?
Mobile app development is the process of building software for phones and tablets. It includes planning, design, coding, testing, and launching the app on the App Store or Google Play.
There are three common approaches:
Native development: Built for one platform (iOS or Android) using platform-specific languages like Swift or Kotlin.
Cross-platform development: One codebase for both platforms, using tools like Flutter or React Native.
Hybrid development: Web technology wrapped inside a native shell.
Factor
Native
Cross-Platform
Hybrid
Performance
Highest
High
Moderate
Cost
Higher
Moderate
Lower
Development Time
Longer
Shorter
Shortest
Platform Support
One platform per build
Both platforms, one codebase
Both platforms, one codebase
Best Use Case
Performance-heavy or hardware-dependent apps
Most business apps and MVPs
Simple, content-based apps
Step 1: Define Goals and Requirements
Before any design or coding starts, get clear on:
Business goals for the app
Target audience and their needs
Monetization model — subscriptions, ads, purchases, or a supporting service
Success metrics — downloads, revenue, retention, or engagement
Budget available for the project
Timeline you’re working toward
Skipping this step can lead to scope changes, delays, and higher development costs later. A one-page brief covering these points gives your whole team a shared starting point.
Step 2: Research Users and Competitors
Good research helps you avoid building features nobody wants. It also shows you where competitors fall short. Key areas to cover:
User personas: Simple profiles describing your typical users, their goals, and habits.
Customer pain points: The specific problems your app needs to solve.
Competitor feature comparison: A side-by-side look at what similar apps offer and where the gaps are.
Market validation: Early signals — surveys, landing pages, or interviews — that confirm demand before you invest in full development.
You don’t need a large research budget. Talking to potential users, reading competitor app reviews, and studying category trends can reveal a lot.
Step 3: Choose Your Architecture
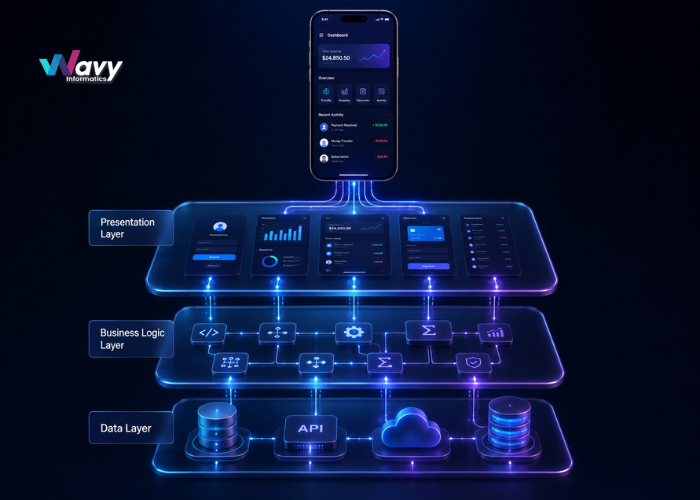
App architecture is how the different parts of your app — the interface, the business logic, and the data — are structured to work together. A well-planned architecture makes it easier to add features later without rebuilding the app.
At a basic level, most apps are organized into three layers:
Layer
Purpose
Presentation layer
What the user sees and taps
Business logic layer
Rules and processing behind the scenes
Data layer
Storage, APIs, and databases
Beyond these layers, teams choose a specific architectural pattern based on the app’s size and complexity:
MVC (Model-View-Controller): Separates data, interface, and control logic. Simple and widely used for smaller apps.
MVVM (Model-View-ViewModel): Adds a layer that connects the interface to the data, making it easier to test and update the UI independently.
Clean Architecture: Organizes code into independent layers so business logic doesn’t depend on any specific framework, making long-term maintenance easier.
Modular Architecture: Breaks the app into independent modules or features, which helps larger teams work in parallel and scale the app over time.
Choosing the right pattern early prevents expensive restructuring once the app has real users and real data.
MVP vs Full-Featured Mobile App: What Should You Build First?
One of the biggest early decisions is whether to build a Minimum Viable Product (MVP) or a full-featured app right away.
What an MVP is: An MVP is the smallest version of your app that still solves the core problem for users. It includes only the essential features needed to test your idea in the real world.
When to choose an MVP:
You’re testing a new idea and want to validate demand before investing heavily
You have a limited budget or timeline
You want early user feedback to guide future features
When to build a full app instead:
You already have validated demand, existing customers, or a proven business model
Your app needs a complete feature set to compete in an established market
You’re replacing or upgrading an existing product
Feature prioritization helps either path. Rank features by how much value they add versus how much effort they take, and build the highest-value, lowest-effort items first.
User feedback should guide what comes after launch. An MVP’s real purpose is to learn quickly and use that feedback to shape the next version, rather than guessing what users want in advance.
Step 4: Plan Features and User Flow
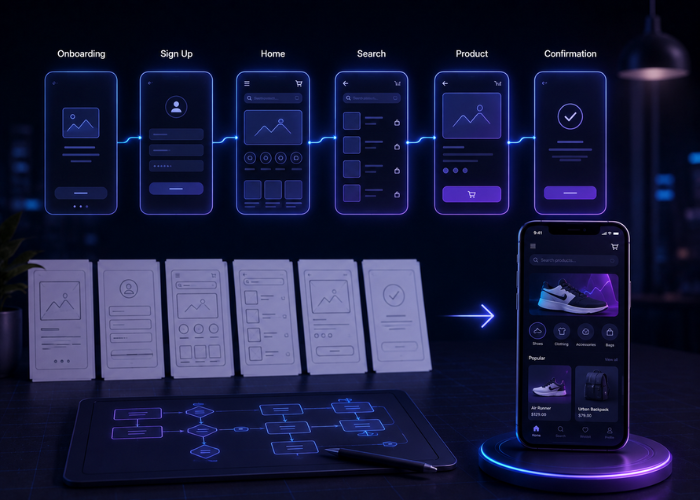
Once you know your MVP or full-app scope, map out how users will move through it:
Feature prioritization: Rank features by value and effort.
User journey: The overall path a user takes from discovering the app to becoming a regular user.
User flow: The specific steps within a task, like signing up or completing a purchase.
Wireframes: Simple sketches of each screen before visual design begins.
MVP scope: A confirmed list of what’s in and out of the first release.
This step acts as the blueprint for design and development. Skipping it often leads to disconnected screens and confusing navigation.
Step 5: App Design
Design isn’t just visuals — it’s how the app feels to use. Key parts include:
UI design: The visual look — colors, typography, icons, and layout.
UX design: How the app functions and feels for the user, from first tap to task completion.
Accessibility: Larger tap targets, readable text, and screen-reader support for users with disabilities.
Responsive layouts: Screens that adapt well across different device sizes.
Onboarding: A short, simple introduction that helps new users understand the app quickly.
Navigation: Clear, consistent menus and paths between screens.
Get the user experience right before finalizing colors and fonts. A visually polished screen that confuses users still fails at its job.
Step 6: Choose the Technology Stack
Your stack should match your app’s requirements, not trends. Common choices include:
Front-end: Swift or Kotlin for native apps; Flutter or React Native for cross-platform apps.
Back-end: Node.js, PHP, or Python, depending on the project’s needs.
Database: MySQL, PostgreSQL, or MongoDB.
Cloud hosting: AWS, Azure, or Google Cloud.
Authentication and APIs: For secure login and third-party integrations like payments or maps.
A good technology partner explains these choices in plain language and ties each one back to your app’s actual requirements, rather than defaulting to a fixed list of tools for every project.
Step 7: Development
This is where the app gets built. It typically includes:
Frontend development: Building the screens and interactions users see.
Backend development: Building the server logic that powers the app.
API integration: Connecting the app to internal or external services.
Database setup: Structuring how data is stored and retrieved.
Authentication: Secure sign-up and login features.
Payment gateway integration: Adding secure payment processing, if needed.
Push notifications: Setting up alerts to re-engage users.
Third-party APIs: Integrating tools like maps, chat, or analytics platforms.
Development usually runs in short cycles, or sprints, with regular check-ins so the business can review progress and give feedback early.
Step 8: Testing and Quality Assurance
Testing catches problems before your users do. A solid QA process covers:
Functional testing: Confirming every feature works as intended.
Performance testing: Making sure the app stays fast under normal and heavy use.
Security testing: Identifying and fixing vulnerabilities that could expose user data.
Compatibility testing: Checking the app works across different OS versions and screen sizes.
Usability testing: Getting real users to try the app and share feedback.
Device testing: Testing across a range of phone and tablet models.
Regression testing: Re-testing existing features after changes to make sure nothing broke.
Skipping this stage is how apps end up with bad reviews and abandoned installs in the first week.
Step 9: Deployment
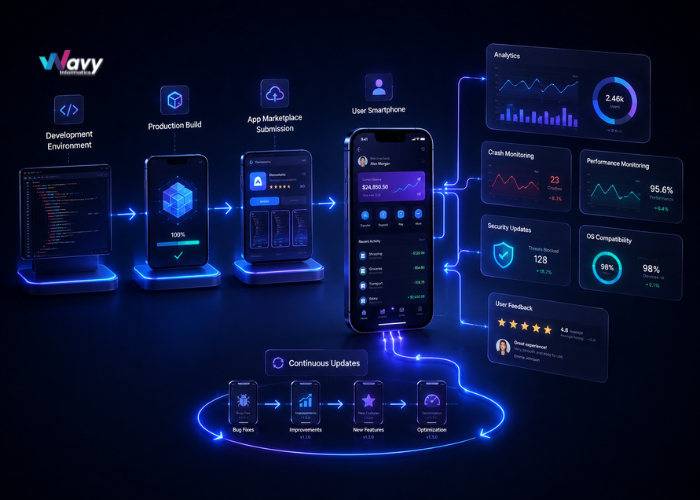
Getting an app live involves several moving pieces:
Production build: Finalizing the version that will be released publicly.
App Store submission: Meeting Apple’s guidelines for design, functionality, and content.
Google Play submission: Meeting Google’s policies for Android app publishing.
App screenshots and description: Visuals and copy that show users what the app does.
Privacy policy: Clear information about how user data is collected and used.
Permissions: Requesting only the device permissions the app actually needs.
App review times can vary, so leave some buffer between submission and your planned launch date.
Step 10: Post-Launch Support
Launch is the beginning, not the end. Ongoing work includes:
Crash monitoring: Tracking and fixing issues that appear once real users are active.
Analytics: Understanding how people actually use the app.
Security updates: Keeping the app protected against new threats.
OS updates: Adjusting the app when Apple or Google release new operating system versions.
User feedback: Listening to reviews and support requests to guide improvements.
Performance improvements: Addressing slow load times or resource-heavy features.
New features: Adding functionality based on real usage patterns and business goals.
Regular updates can help improve stability, address user feedback, and keep an app compatible with newer devices and operating systems.
How Long Does It Take to Develop a Mobile App?
There’s no single timeline that fits every project. Development time depends on:
App complexity: Simple apps move faster than apps with advanced logic or workflows.
Number of platforms: Building for both iOS and Android takes longer than building for one, unless you’re using a cross-platform framework.
Features: Each additional feature adds design, development, and testing time.
UI/UX requirements: Highly custom designs take longer than simpler layouts.
Backend complexity: Apps needing custom servers, databases, and APIs require more development time.
Integrations: Payment gateways, third-party APIs, and advanced services add to the schedule.
Testing: Thorough QA across devices and platforms extends the timeline but reduces post-launch issues.
The best way to get a realistic timeline is to share your specific requirements with a development team, since every project’s scope is different.
How Much Does Mobile App Development Cost?
There’s no fixed price for mobile app development. Cost depends on several factors:
MVP vs full app: An MVP typically costs less since it includes fewer features.
Native vs cross-platform: Native development for two platforms usually costs more than a single cross-platform codebase.
Number of features: More features mean more design, development, and testing work.
Backend complexity: Custom servers, databases, and business logic add to the cost.
Integrations: Payment systems, third-party APIs, and advanced services affect pricing.
Testing: Thorough testing across devices adds time and cost, but reduces post-launch problems.
Maintenance: Ongoing support and updates are an additional cost after launch.
The only accurate way to get a cost estimate is to share your specific requirements with a development team, since every project has different needs.
Common Mistakes to Avoid
Starting development before requirements are clear
Poor or skipped user research
No MVP strategy before building a full app
Choosing the wrong architecture for the app’s scale
Ignoring scalability as the app grows
Treating design as decoration instead of function
Picking technology based on price alone
Skipping proper testing
Poor app security
No analytics in place after launch
No post-launch maintenance plan
Quick Checklist
Define your goals and audience
Research users and competitors
Validate the idea (MVP validation)
Choose your architecture
Scope your MVP or full-app features
Design the user experience
Choose your tech stack
Build the app
Test thoroughly
Deploy to app stores
Maintain and improve after launch
Why Work With Wavy Informatics
Wavy Informatics is a web and mobile app development company. We help startups and businesses handle every stage of mobile app development, including:
Mobile app development works best as a clear process: define your goals, research your users, choose the right architecture, decide between an MVP and a full build, design with purpose, build carefully, test thoroughly, and keep improving after launch. Getting these steps right, in order, is what separates apps that succeed from apps that stall.
It’s the full journey from idea to launch — planning, research, architecture, design, development, testing, deployment, and post-launch support.
Q2. How long does it take to develop a mobile app?
Timeline depends on app complexity, number of platforms, features, and backend needs. There’s no single fixed timeline that applies to every project.
Q3. How much does mobile app development cost?
Cost depends on factors like MVP vs full app, platform choice, number of features, and backend complexity. A development team can give an accurate estimate based on your requirements.
Q4. Should I build an iOS or Android app first?
This depends on where your target audience spends their time. Research into your specific market can help guide this decision.
Q5. Is cross-platform app development a good choice?
For many business apps and MVPs, cross-platform development offers a good balance of cost, speed, and reach across both iOS and Android.
Q6. What architecture is best for a mobile app?
It depends on the app’s size and complexity. Simple apps often use MVC, while larger or growing apps benefit from MVVM, Clean Architecture, or Modular Architecture.
Q7. What is the difference between MVP and a full-featured app?
An MVP includes only the core features needed to solve the main problem and test demand. A full-featured app includes a complete set of features built for an established or validated market.